 |
Pages: « ... 26, 27, 28, 29, 30, 31, 32, 33, 34, 35, 36, 37, 38, 39, 40 » : All |
   |
|
 Author Author |
 Right - join Part A to Part B etc, etc, etc (currently 27,810 views) Right - join Part A to Part B etc, etc, etc (currently 27,810 views) |
| mike brown |
| Posted on: June 30th, 2021, 20:05:49 |
  |
|
Big Member


Location: Southampton
Posts: 419
|
|
Fuse box corrosion is quite likely and yes the fuse in and out a few times will clean it. I would however have a better try at cleaning it as the corrosion/high resistance is likely to return when dampness sets in.
Mike |
|
|
|
 |
Reply: 525 - 599 |
|
 |
| Graham Bichard |
| Posted on: July 3rd, 2021, 18:46:59 |
|
|
Maximum Member2


Posts: 751
|
|
And I'll keep the fire extinguisher to hand too Mike!
 |
|
|
|
| |
Reply: 526 - 599 |
|
|
| Graham Bichard |
| Posted on: August 7th, 2021, 15:58:12 |
|
|
Maximum Member2
Posts: 751
|
|
Just a short update. I've been both very busy of late and a little under the weather, but a little progress made.
I'm hoping to visit next Friday, a company who could map the car for me. Not someone I've used before (and a little bit of a trek), so am going to visit them to get a feel for the place before committing.
And I'm relieved to say that the speedo problem (it not working) might be a simpler solution. I'd feared that the drive cogs at the gearbox might be U/S, but having unclipped the speedo cable at the speedo end and reversed/driven the car slowly on the driveway, with my finger on the end of the cable I can feel it turning. So I think the inner drive cable might be too short to engage with the speedo instrument (I made sure the plastic clip was fully engaged in the rear of the instrument pod as a check before removing it to check the plastic cogs were working).
Small steps. |
|
|
|
| |
Reply: 527 - 599 |
|
|
| Graham Bichard |
| Posted on: August 15th, 2021, 16:09:28 |
|
|
Maximum Member2
Posts: 751
|
|
Went to visit RS Tuning in Leeds on Friday:
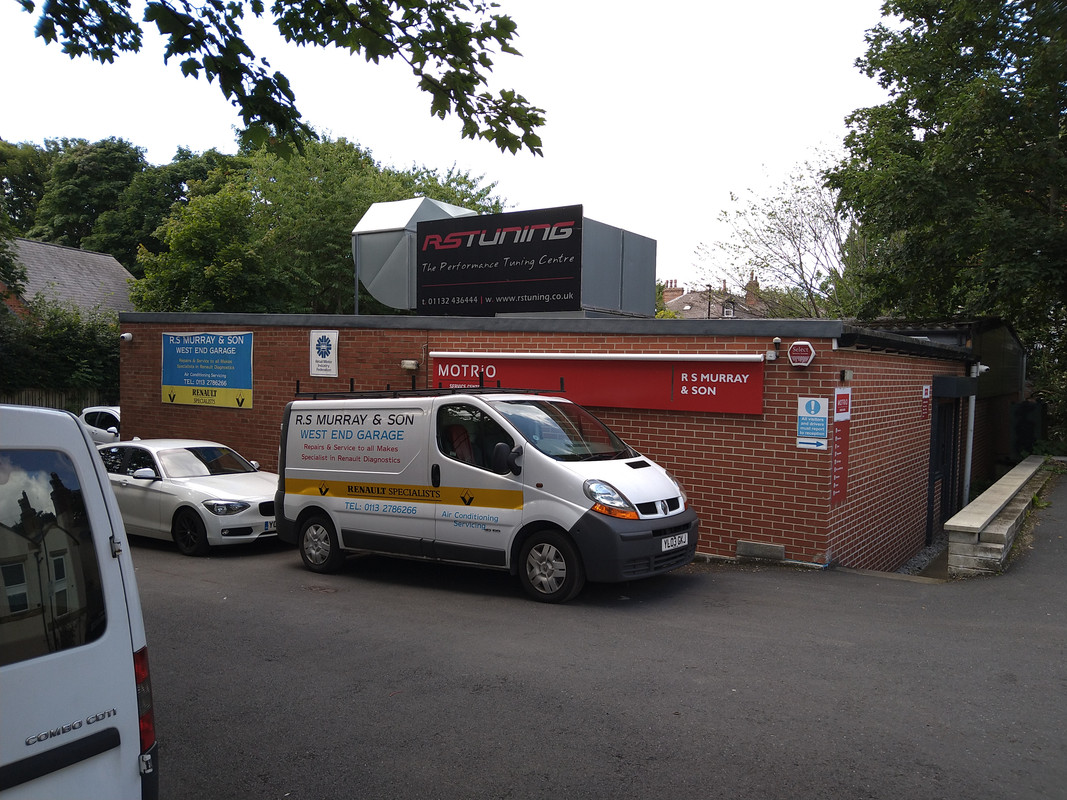 photo hosting sites photo hosting sites
The garage is located 'down a back street', at least the way the satnav took me. But it certainly didn't have the look or feel of a back street garage - clean & tidy, appeared organised. And took the time to have a quick chat about the MM and what might be required.
While I don't know anyone who's used them personally, there doesn't seem to be anything negative online either, so these could be the people to map the ecu.
What the guy did recommend is sorting the throttle cable throw first to prevent having to have a revisit to re-map at a later date.
Not quite sure what the solution is for the throttle cable at the minute (full throttle application only opens the butterfly approx. 75%, so a longer throw needed somehow I think). I also need to get a 90 degree bend cable made.
And I'll need to sort out getting the car transported to (and back from) Leeds, which I'm sure won't be cheap.
But another small step forward I hope. |
|
|
|
| |
Reply: 528 - 599 |
|
|
| mike brown |
| Posted on: August 15th, 2021, 20:11:22 |
|
|
Big Member
Location: Southampton
Posts: 419
|
|
Can you move the pivot on on the throttle peddle to give more throw, failing that shorten the lever on the throttle body. As for moving the car shiply might be a good place to try.
Mike |
|
|
|
| |
Reply: 529 - 599 |
|
|
| Graham Bichard |
| Posted on: September 9th, 2021, 17:28:21 |
|
|
Maximum Member2
Posts: 751
|
|
Hi Mike.
Sorry for the late reply. I looked at the throttle cable the other week - I've managed to re-route the cable to give a 'cleaner' route which gives almost full throttle. Enough for me to warrant getting the car mapped.
I still need to sort out another throttle cable, one which will fit beneath the bonnet when fitted but again, another small step forward. |
|
|
|
| |
Reply: 530 - 599 |
|
|
| Graham Bichard |
| Posted on: October 4th, 2021, 17:59:02 |
|
|
Maximum Member2
Posts: 751
|
|
It's mapped! And giving 88bhp at the flywheel.
Not without a couple of issues though - I'll detail more at the weekend.
|
|
|
|
| |
Reply: 531 - 599 |
|
|
| Craig Smith |
| Posted on: October 4th, 2021, 18:14:38 |
|
|
Big Member

Location: Bury
Posts: 254
|
|
Well done Graham, that must feel like a massive step forward.
Any chance of an article for the magazine please? |
Last modified October 4th, 2021, 18:15:30 by Craig Smith |
|
|
|
| |
Reply: 532 - 599 |
|
|
| Graham Bichard |
| Posted on: October 8th, 2021, 09:41:11 |
|
|
Maximum Member2
Posts: 751
|
|
Craig - yes a relief to get this done, but as mentioned not without problems. The problems started before the car was transported to RS Tuning but I'll return to this in a bit.
RS Tuning recommended fitting a new Lambda sensor. Because the car had been running so rich, the lambda sensor had been contaminated. While on the rolling road the sensor did appear to clean up but did still occasionally give a 'bad' reading, causing the car to revert to a rich, protection running mode. I did fit a new lambda during the build - a pattern part from memory as I don't think the Rover OEM is still available. For the sake of £40 or so (I can't remember how much it was exactly) it would be worth swapping this out.
Hopefully the sensor hasn't welded itself in to the manifold after going through heat cycles. I'm not sure that I'll be able to change it in situ - that'd be too much to hope for. We'll see.
They also advised that during the session the car was running hot. That is, they recommend fitting a more powerful cooling fan. Of course I'll look at doing this - they did recommend a make (Spall) which I'll research. I'm not sure I can fit a larger diameter fan to the radiator, but it may be possible to fit a deeper (thicker fan blade) fan, or perhaps two fans.
And now the big problem. The car was almost out of fuel so I decided of course to fill it. I've never had more than around 10 litres in it previously but decoded to put more in it, not knowing how much would be needed. I put another 10 litres in and then noticed the smell of petrol. Long story short - the fuel was leaking around the fuel sender. Bugger.
Tightening up the accessible screws slowed the flow quite a bit and I hoped (beyond hope) that the gasket was just 'dry' and would seal as it swelled. No such luck.
I was debating whether to call the whole thing off (and lose the rolling road slot deposit) and called the transportation guy (who is also a part time mechanic at my local, trusted garage). He suggested he look at it and ended up putting a silicon sealant around/over the sender, which further slowed but didn't stop, the leak. So we took the decision to send the car down and keep an eye on it the next day and discuss it with RS on arrival.
But this still needs to be addressed. I've ordered and received three new gaskets (£1.06 each) in case there is any variation in these (I'll choose the best one to fit). The fuel appears to be coming through the screw head holes, not just around the sender sensor.
I did use a liquid gasket when fitting this originally (so many years ago!), but is there a sealant you'd suggest I use.
The main question is though - can this be dome with the subframe and tank in place? I don't think so, but want to get this confirmed before attacking the car.
I know the lower two screws cannot be accessed as it is. If I can change this gasket just by moving the tank (lowering it slightly) then I'll need to remove the fibreglass cover I have in place around the filler neck. If I need to remove the rear subframe, that's a whole different kettle of fish (  ). ).
What's the general opinion - I'll need to lower the subframe?
While I've bought the gasket, I'll have to take it easy on the spending front for a little while - having the car transported to Leeds and the rolling road session cost a pretty penny. But I also need to have another throttle cable made up and possibly a new speedo cable with a longer inner. Hopefully these two items won't be too expensive and I'll be able to tick these two items off the 'to do' list.
Finally, while my scanner isn't working at the minute, a couple of photos of the printouts received from RS from the session:

This first one gives a plot of power/torque - 88.7bhp (89 for cash?) and 85.6 ft/lbs. While I'd hoped for a little more power, look at the power/torque curves! Should be very nice to drive (eventually!). RS did say that the car could probably do with another hour or so on the rolling road to fine tune the car when it has a few miles on the engine. Hopefully it might break 90bhp.
As an aside, MPI mini 90bhp kits used to give around 82-85bhp (on a good one), and I know 1380cc carb engines can give 100bhp, so ~90bhp on a home built engine with a home ported head isn't so bad. And at least I know it holds together up to 6600rpm .
This second photo shows the fuel/air ratio (14.7 being stoichiometric):
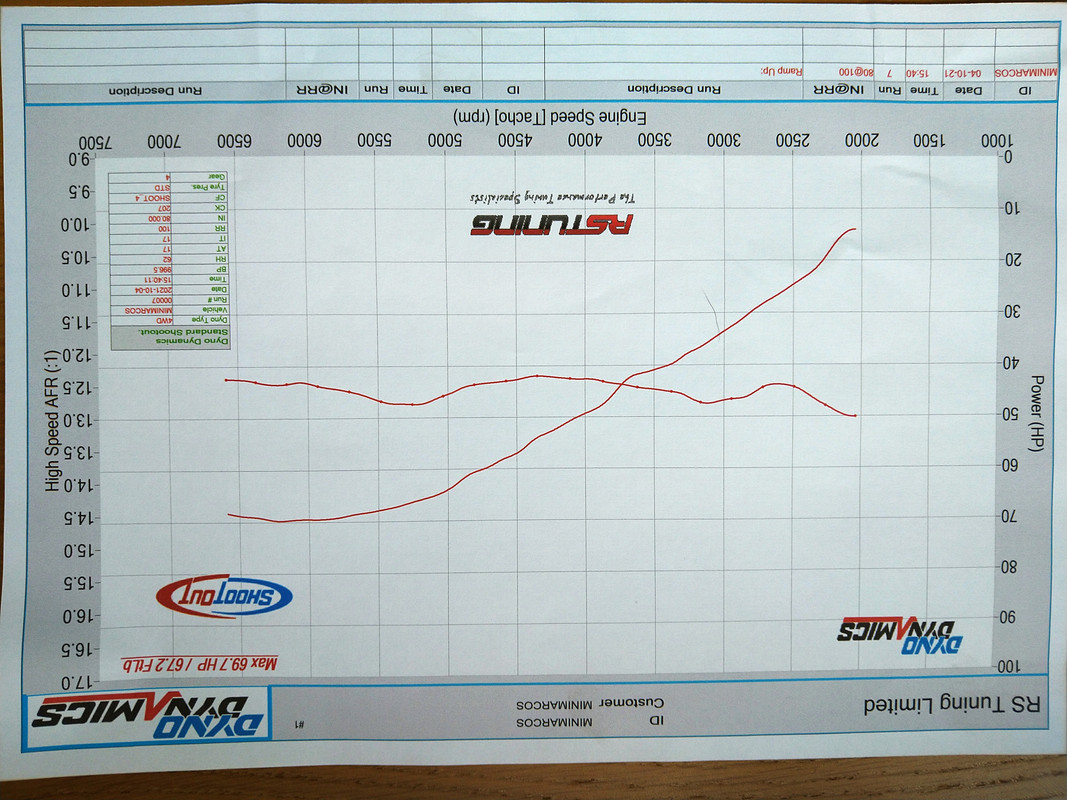
So there we are - two steps forward, one step back (again!).
Craig - I wasn't able to attend the rolling road session so can't comment on exactly what this was like, or how easy the software was to adjust etc. but can put a few words together supported by lots of photos if it'll help to put into the magazine?
ETA - Not sure why the images are rotating through 90 degrees. Perhaps they're giddy with excitement too!
|
Last modified October 8th, 2021, 09:43:56 by Graham Bichard |
|
|
|
| |
Reply: 533 - 599 |
|
|
| Craig Smith |
| Posted on: October 8th, 2021, 16:06:42 |
|
|
Big Member
Location: Bury
Posts: 254
|
|
Hi Graham,
I know that you are watching the pennies, but have you considered a club radiator, with one or two SPAL fans that we also hold in stock? My car is a 1380 (carb) with 105hp and I have never had any cooling issues with it (club rad and one SPAL fan fitted).
As for your fuel leak, did you use copper washers on the bolts when fitting the sender unit? If not you need to.
|
Last modified October 8th, 2021, 16:10:44 by Craig Smith |
|
|
|
| |
Reply: 534 - 599 |
|
|
| Graham Bichard |
| Posted on: October 10th, 2021, 14:31:28 |
|
|
Maximum Member2
Posts: 751
|
|
Craig - I don't have copper washers fitted to the sender unit. The tank/sender unit were purchased new as a unit and I don't ever recall there being any provided - this might be the cause of the problem then.
(I take it they're a kind of crush washer?)
So is it worth me trying to fit these one at a time (using an instant gasket too) to try and seal the sender before going the route of trying to lower the subframe? Must be worth a try, do you think, starting with the two lower retaining screws (the ones masked by the subframe and difficult to get at?
As for the rad/fan, I have an alloy Fiat Cinq radiator fitted - this being discussed as the way to go before the club started supplying items. I'll do some research into the Spall/SPAL fan first before making a decision on this. I've never had a problem with the car running too hot (albeit only running/idling on the drive of course) with the fan cutting in when temp reached, so guess it is the extra heat/stress generated by running on the RR.
Something I didn't mention earlier (in regards to the RR session), RS had to do the mapping in 3rd gear as the car kept jumping out of 4th. This reminded me that the car did this when I drove it to the IVA test. I think it's to do with the fact that the engine/transmission is absolutely solidly mounted due to the proximity of the bulkhead (to either this or the original fuel injection system) with no rock/give whatsoever. This will need to be addressed in due course, possibly with a modified gear selector mechanism. Does this sound a plausible explanation?
ETA - Using the guess-works calculator, at 6600rpm the car would be doing around 140mph apparently. I should think that'll do for now...
Edited again to add - just looked at the Minispares website and can't see any mention of copper washers:
http://www.minispares.com/cata.....el~Tanks.aspx?1~6~50
Any ideas? |
Last modified October 10th, 2021, 14:56:41 by Graham Bichard |
|
|
|
| |
Reply: 535 - 599 |
|
|
| Craig Smith |
| Posted on: October 11th, 2021, 08:20:12 |
|
|
Big Member
Location: Bury
Posts: 254
|
|
|
|
|
| |
Reply: 536 - 599 |
|
|
| Neil KilBane |
Posted on: October 11th, 2021, 12:26:03
 Attachment: sender_1.jpg - 20.28 KB (5687 views) Attachment: sender_1.jpg - 20.28 KB (5687 views) |
|
|
Maximum Member2

just a little fine tuning left to do.
Location: Newtown Forbes, Ireland
Posts: 1,416
Reputation: 0 (tot: ) |
|
Fuel leak from the sender unit is very common but can be a bugger to sort. I ran in to it myself a few years back even though everything I was using was new (tank/gaskets/sender unit etc.).
After many attempts , the combination that finally worked for me was.
1. I changed the screws for Stainless Steel Cheese Head Hex Socket bolts. This makes the access issues much more simple as it does away with need for screwdrivers.
2. I added a washer and a rubber O ring to each bolt, the rubber compresses and reduces the chances of fuel seeping past the bolts.
3. I used a good quality gasket cement and copious amounts of it, on both sides of the cork gasket and under the O rings and Washers. |
|
 |
|
|
|
| |
Reply: 537 - 599 |
|
|
| Neil KilBane |
Posted on: October 11th, 2021, 12:27:07
Attachment: sender_2.jpg - 26.32 KB (5683 views) |
|
|
Maximum Member2
just a little fine tuning left to do.
Location: Newtown Forbes, Ireland
Posts: 1,416
Reputation: 0 (tot: ) |
|
| Final result. |
|
 |
|
|
|
| |
Reply: 538 - 599 |
|
|
| Graham Bichard |
| Posted on: October 12th, 2021, 16:15:02 |
|
|
Maximum Member2
Posts: 751
|
|
Thanks for the link Craig - don't now why I could see that. I'm a little surprised that I haven't heard of this van tank leaking problem before (although I've never owned a vehicle that's used this tank to be fair, but would've thought it would've been 'advertised' when I bought the tank kit.
The link helpfully shows some standard hex head screws too, so I've ordered these too.
Neil - I'm guessing socket head screws might have a smaller head diameter, therefore could possibly fit in the gap available easier. I might yet need to get my hands on these if I can't get the hex heads in place - do you know the thread details (Minispares doesn't give this info)?
Do you recall what type of sealant you used (petrol resistant)?
And for clarity - you fitted the rubber O-ring tank side of washer (washer in contact with the screw head)?
Thanks both - I'll definitely be trying this as a solution before I do anything drastic like dropping the tank. I've syphoned the tank as much as I can so will clean up the sender unit before resealing/replacing screws and see if it safely solves the problem. |
|
|
|
| |
Reply: 539 - 599 |
|
|
Pages: « ... 26, 27, 28, 29, 30, 31, 32, 33, 34, 35, 36, 37, 38, 39, 40 » : All |
|
|


 Mini Marcos Forum > General Boards > Mini Marcos > Right - join Part A to Part B etc, etc, etc
 Logged