|
|
 Author Author |
 Marcos 7184 (currently 9,409 views) Marcos 7184 (currently 9,409 views) |
| Herve_barriere |
| Posted on: July 22nd, 2014, 14:47:29 |
  |
|
Baby Member

Location: France
Posts: 47
|
|
hi
thanks for informations, I have seen the mounting on mini on internet, i was not sure on the MM. I think it will be better to rebuild the area properly and do the same for the right side too in order to ovoid the problem. |
|
|
|
 |
Reply: 15 - 58 |
|
 |
| admin |
Posted on: July 23rd, 2014, 17:06:44
 Attachment: p1130224.jpg - 61.47 KB (3762 views) Attachment: p1130224.jpg - 61.47 KB (3762 views) |
|
|
 Administrator Administrator


Location: Maidenhead, UK
Posts: 2,377
Reputation: 1 (tot: 1) |
|
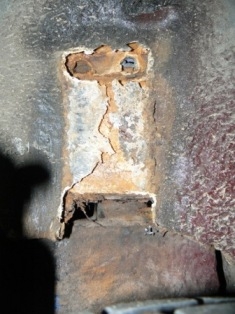
Photo for Hervé. Sorry one or two members are having problems uploading photos.
Front damper bracket mount. |
 |
Last modified July 23rd, 2014, 17:08:57 by admin |
|
|
|
 |
Reply: 16 - 58 |
|
|
| admin |
Posted on: July 23rd, 2014, 17:07:12
Attachment: p1130234.jpg - 54.14 KB (681 views) |
|
|
Administrator
Location: Maidenhead, UK
Posts: 2,377
Reputation: 1 (tot: 1) |
|
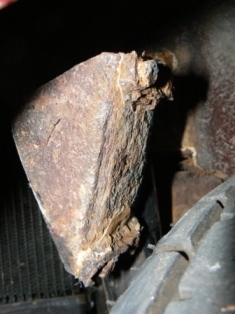
| The other one. |
 |
|
|
|
| |
Reply: 17 - 58 |
|
|
| mike brown |
| Posted on: July 23rd, 2014, 21:12:36 |
|
|
Big Member


Location: Southampton
Posts: 419
|
|
Looking at the photo it's pulled through both the cross member, steel plate and the fibreglass. Your only real coarse of repair is cut it all out and rebuild with either new metal or if you know what your doing it is possible to do it with just fibreglass.
Mike |
|
|
|
| |
Reply: 18 - 58 |
|
|
| Brian |
| Posted on: July 23rd, 2014, 21:45:32 |
|
|
Big Member
Location: San Mateo, CA, USA
Posts: 330
Reputation: 0 (tot: ) |
|
| Okay, jumping in here -- for my car, any hints on where these should be mounting? I've been unable to determine any good locations for the shock mounts on my MK6. It sounds like those will be into the side of the cross-member? I'm not aware of any markings that will let me locate them in there. Is this going to be another probing trip in which I try to use lights and magnets, etc to find that? |
|
|
|
| |
Reply: 19 - 58 |
|
|
| mike brown |
| Posted on: July 24th, 2014, 05:39:48 |
|
|
Big Member
Location: Southampton
Posts: 419
|
|
The simplest way is to remove the rubber "spring" and allow the top arm to sit hard against the bump stop. Position the damper fully compressed add about 15mm and mark. Repeat at full droop only extend the damper fully this time and minus about 15mm and mark. Now posstion the damper somewhere between the two to best suit mounting (ie bolt clearance). Temporary fix in this position now swing the suspension through a fully cycle make sure it doesn't bottom out either end (allow a bit more for bump stop compression) then drill off and reassemble.
Mike |
|
|
|
| |
Reply: 20 - 58 |
|
|
| Brian |
| Posted on: July 24th, 2014, 07:49:02 |
|
|
Big Member
Location: San Mateo, CA, USA
Posts: 330
Reputation: 0 (tot: ) |
|
Ah, I take that to mean that there aren't pre drilled and tapped holes sitting somewhere behind the fiberglass? Ive already done that expedition to find the brake/clutch cylinder holes...
What's behind there? Is that into the side of the crossmember?
Before I saw this thread, I was thinking the only option would be to drill some holes, and use nuts and a backing plate, through the vertical fiberglass piece separating the engine bay from the wheel wells, and somehow reinforce the holes to prevent them from widening -- something I was skeptical about, which is why I still have no front shocks installed. |
|
|
|
| |
Reply: 21 - 58 |
|
|
| mike brown |
| Posted on: July 24th, 2014, 09:10:21 |
|
|
Big Member
Location: Southampton
Posts: 419
|
|
Earlier cars you picked up holes just above and below the steel mini crossmember. I think mk4 had custom steel plates either side instead of a full crossmember I believe mk5 didn't have steel at all. I've seen shocks mounted with the bracket bolts either side of the crossmember mk3-4 and a mk5 with two in between and two above. As long as they don't bottom out either end, don't rub and are in the right plain they'll be fine.
Mike |
|
|
|
| |
Reply: 22 - 58 |
|
|
| Herve_barriere |
| Posted on: June 6th, 2015, 10:59:05 |
|
|
Baby Member
Location: France
Posts: 47
|
|
Hi everybody
After a long period (due to newborned twins), I could start the work on the marcos.
As a good frog boy, I have to buy tools in inches and not metric.

First step, disassembly the interior in order to have a lighter car to move.
Surprise, steel on the floor, severals damage on the shell, fiber work to take into account for future.


|
|
|
|
| |
Reply: 23 - 58 |
|
|
| Herve_barriere |
| Posted on: June 6th, 2015, 17:14:51 |
|
|
Baby Member
Location: France
Posts: 47
|
|
we will lift the body with a system fixed on front subframe fixation. Just a steel bar with a cut of scare tube which slide on it. We could balance the car during the lift.


 |
|
|
|
| |
Reply: 24 - 58 |
|
|
| Herve_barriere |
| Posted on: June 6th, 2015, 17:20:17 |
|
|
Baby Member
Location: France
Posts: 47
|
|
the under of the shell is not in good conditions (wood parts are fixed in the tunnel for the gearbox linkage)


Shell view at the front suspension bracket. We will work on it during the restauration (on both side) and we will make new steel insert
 |
|
|
|
| |
Reply: 25 - 58 |
|
|
| Herve_barriere |
| Posted on: June 6th, 2015, 17:25:08 |
|
|
Baby Member
Location: France
Posts: 47
|
|
So, we will take off the engine from subframe

Finally, the front subframe is in good condition. Just a sanding & new paint and it will be ok

Santa Claus works for me !!
 |
|
|
|
| |
Reply: 26 - 58 |
|
|
| Herve_barriere |
| Posted on: June 6th, 2015, 17:30:13 |
|
|
Baby Member
Location: France
Posts: 47
|
|
After front subframe, go for rear subframe. We have a lot of difficulty to disassembly from the body (one day to take off). All bolt are rusty and we have to drill it and finally, cut the body (we broke 2 drills)


Rear subframe is very rusty, with lot of deformations & cracks. Fortunetly, a friend of my dad have one in good condition. Give for free. Thanks Georges.
 |
|
|
|
| |
Reply: 27 - 58 |
|
|
| Herve_barriere |
| Posted on: June 6th, 2015, 17:35:41 |
|
|
Baby Member
Location: France
Posts: 47
|
|
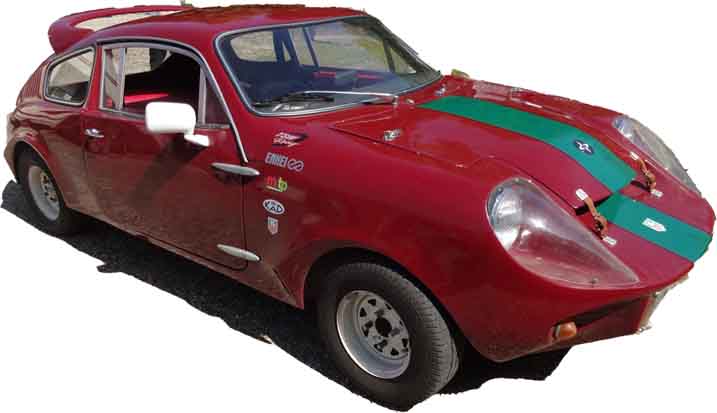
Ok, disassembly is fun but how I will paint the car.
My wife created severals proposal and below, that I choose.
The rear fin will be cut, I do not like it.

In order to have a better idea, I put scotch to simulate. At the end, I have to change the place of the line to the other side because the fuel cap breaks the vision.


 |
|
|
|
| |
Reply: 28 - 58 |
|
|
| Herve_barriere |
| Posted on: June 6th, 2015, 17:38:00 |
|
|
Baby Member
Location: France
Posts: 47
|
|
Next step, in august because the car is 600 km far from me.
To be continued..... |
|
|
|
| |
Reply: 29 - 58 |
|
|
|


 Mini Marcos Forum > General Boards > Mini Marcos > Marcos 7184


 Logged